> For the complete documentation index, see [llms.txt](https://docs.optis.me/llms.txt). Markdown versions of documentation pages are available by appending `.md` to page URLs; this page is available as [Markdown](https://docs.optis.me/product-options/20-option-types/swatch-and-button/swatch.md).
# Swatch
A **Swatch** shows each value as a color block or a small image instead of a list, so customers can visually pick a color, style, or material.
✨ [Demo store](https://optis-product-options-variant.myshopify.com/products/swatch?variant=51025989075222)
## When to use a Swatch
* **Color selection** for apparel or accessories.
* **Material or texture choice** for furniture and home decor.
* **Visual personalization** - monogram styles, finishes, and more.
## How to add a Swatch option
### Step 1: Add the option
Open **1. Add options**, click **Add option**, tick **Swatch** under **Swatch** on the **New options** tab, then click **Add options**.
### Step 2: Name it, add values and set each swatch
Enter the **Label on product** (e.g., "Choose Color") and add the **Option values** (e.g., Red, Blue, Black). Tick **Required field** if customers must choose before checking out, or **Hide option label** to hide the label.
For each value, choose:
* A **color swatch** (solid color)
* Or an **image swatch** (upload your own image)
Tick **Show option value label** if you also want the value's name shown below or next to the swatch.
### Step 3: Save and test
Click **Save**, then open the product page on your store to check that the Swatch works correctly.
## Option settings
Set only what you need - all of the settings below are optional. In the **Option values** table, click **Columns** to show **Add-on**, **Help text**, **SKU** or **Quantity** for each value:
* **Add-on** - charge extra for a value (**Extra fee**, Advanced plan and above) or link it to a Shopify variant (**Upsell product**, Platinum and above). See [Manage add-on (additional fee for option)](/product-options/advanced-setup/manage-add-on-additional-fee-for-option.md).
* **SKU** - a SKU for that value. Advanced plan and above.
### Default value
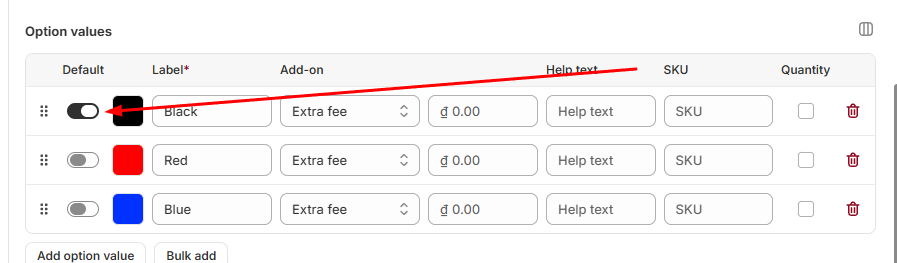
Toggle **Default** for the value that should be pre-selected when the customer opens the product page (e.g., "Black" selected automatically).
How it looks on your storefront:
### Quantity
Turn on the **Quantity** column so customers can pick several values and set how many of each, using **Min quantity** and **Max quantity**. Available on the **Platinum** plan and above. See [How to Use the "Quantity" Feature for Options](/product-options/advanced-setup/how-to-use-the-quantity-feature-for-options.md).
### Limit how many values can be selected
Set **Min** and **Max** to control how many values a customer can pick. Available on the **Advanced** plan and above. See [Limit Min/Max Selectors](/product-options/faq/limit-min-max-selectors-in-checkbox-button-options-swatch.md).
### Help text
Add a short note explaining what to choose. Choose how it's shown: **Tooltip**, **Below the option title**, **Beside the option title**, or **Below the option**.
### Preview the choice on the product (live mockup)
Show customers what their selected swatch looks like on the product image, updated in real time. Available on the **Platinum** plan and above. See [Product Personalizer - Live Mockup Settings](/product-options/advanced-setup/product-personalizer-live-mockup-settings.md).
### Show or hide with Visibility (conditional logic)
Show or hide the Swatch based on another option. Available on the **Advanced** plan and above. See [How to set up Conditional logics?](/product-options/advanced-setup/how-to-set-up-conditional-logics.md).
With many values, you can arrange them in a single line or let them wrap, using **Option width** in the **Display** tab.
## Related guides
* [Button](/product-options/20-option-types/swatch-and-button/button.md)
* [Manage add-on (additional fee for option)](/product-options/advanced-setup/manage-add-on-additional-fee-for-option.md)
* [How to Use the "Quantity" Feature for Options](/product-options/advanced-setup/how-to-use-the-quantity-feature-for-options.md)
* [Limit Min/Max Selectors](/product-options/faq/limit-min-max-selectors-in-checkbox-button-options-swatch.md)
* [Product Personalizer - Live Mockup Settings](/product-options/advanced-setup/product-personalizer-live-mockup-settings.md)
* [How to set up Conditional logics?](/product-options/advanced-setup/how-to-set-up-conditional-logics.md)